The kube: the Smallest Enterprise Home Lab
Disclaimer: This blog was written without the help of LLMs (although that should be obvious) or any kind of financial incentive. I bought all the hardware myself, don’t have stocks in any of these companies and don’t use affiliate links. The result is entirely my own, unprofessional rambling. Though no one can claim to be devoid of bias, this article is as honest as I dare to be with myself. Which may not be a whole lot after spending hundreds on a weird homelab, but it’s the best you’re going to get.
You’ve seen Kubernetes run on big EPYC servers in data centers, and on F-16 fighter jets. You’ve seen it run on Raspberry Pis and even on phones.
The big professional setups guzzle electricity, water (and jet fuel), but the smallest setups are limited, mostly due to storage and network bandwidth.
What if we could run a distributed, reasonably powerful Kubernetes cluster, including distributed storage, using efficient single-board computers (SBCs) without the limitations that they usually have?
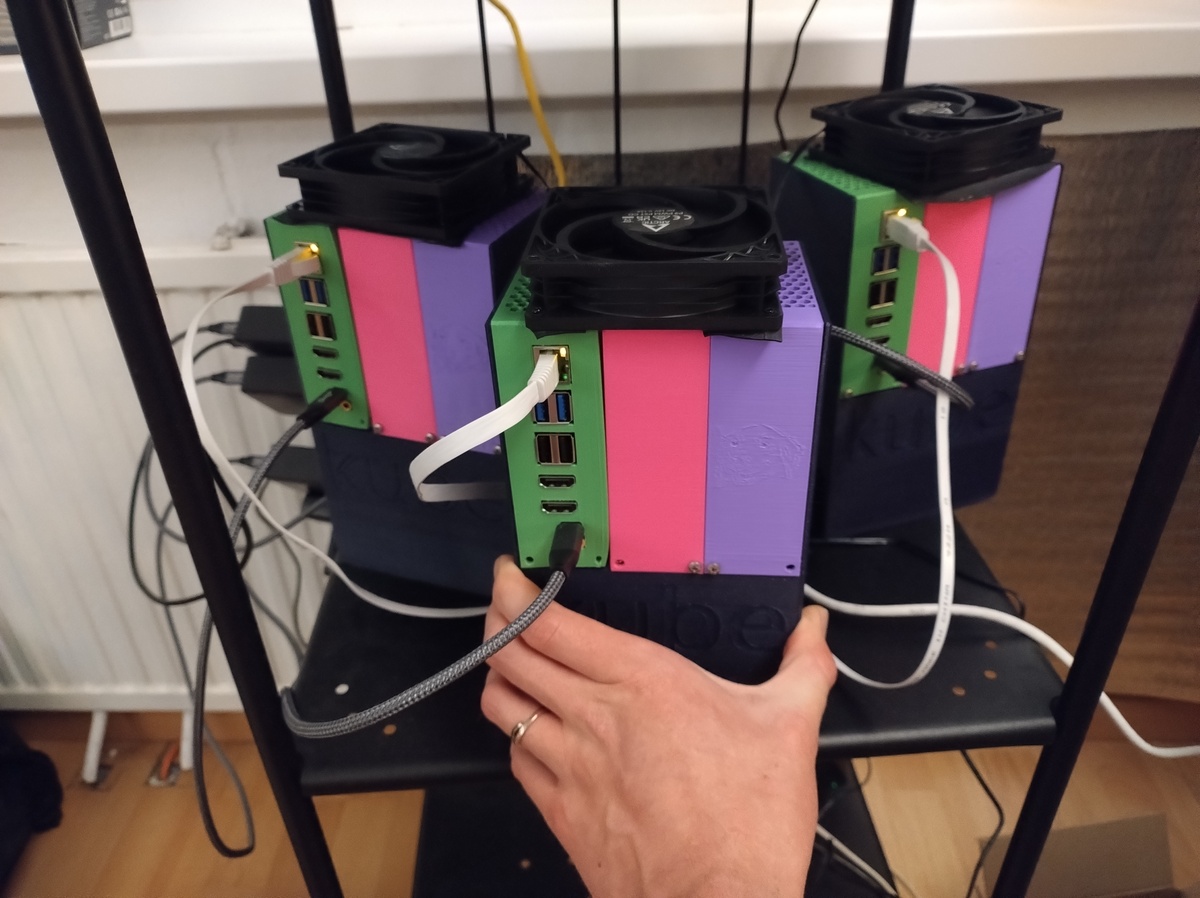
With the help of some friends, I built a setup that is exactly that: the smallest enterprise homelab. I call the nodes kubes.
Let’s start with the why. Or just skip to a section you are interested in.
Why small?
You might want your homelab to:
- take little physical space
- need little electrical power
- make little noise
So you may think you can just buy a Raspberry Pi with Raspberry OS and run Docker Compose on it. Think again.1
Why enterprise?
Kubernetes is cool. GitOps is cool. Not needing to run a number of scripts in a very specific order, or remember a bunch of sysctls you need to set, and just being able to copy from kubesearch to deploy an app without any commands except just adding code to a Git repo is really cool. But you can run Kubernetes anywhere, so why do I need specific hardware? Even Talos, which removes the traditional Linux administration layer and gives an OS that only runs Kubernetes, runs on any x86 hardware and a bunch of SBCs (single board computers). What is special about my hardware setup and why did I pick such a weird setup?
Enterprise SSDs
You probably want to use Enterprise SSDs in your homelab eventually. The property of the drive that matters is Power Loss Protection (PLP).
Especially for databases like etcd (Kubernetes control plane), Postgresql, and distributed storage like Ceph.
Why? The short version is: those databases are very slow on consumer SSDs and they destroy them as well, especially if they write to them often. Etcd does in a normal Kubernetes setup. My friend @uhthomas is the big Enterprise SSD evangelist in Home Operations, he’ll write a blog post on it soon with more details. Ask him when the blog post goes live on Discord.
And no, enterprise SSDs are actually not that expensive if you buy them used.
The problem with Raspberries and laptops
So why don’t we just add enterprise SSDs to a laptop or Raspbery Pi and use that as a node?
I started homelabbing with 3 laptops and that’s exactly what I did. The problem is form factor and connectivity:
- Most laptops have either mSATA or SATA via M2 connections
- Enterprise SSDs typically (exclusively?) come in 2.5" SATA, M2 NVMe or U.2 form factors
The solution seemed simple: a USB 3 port offers enough bandwidth and power for a SATA 2.5" SSD, so I’ll just connect an Enterprise drive to every laptop via USB 3 and run Ceph on that. This seems to work at first but there were hiccups. Apparently, the USB controller resets sometimess and this would cause a node to hang. After a while, it became more frequent, and I decided to switch to better and smaller hardware. Not sure if Longhorn would have fared better here.
The problem with the Raspberry Pi is similar: besides USB, the Pi 5 has a proper PCIe connection, which is used by most Pi-NAS solutions. Unfortunately, it only has a single PCIe 2.0 lane available, which caps bandwidth at 500MB/s. OK for a single drive, but expensive: at the same price, you can get a machine with much more storage bandwidth (and RAM).
Mini-PCs like the NUC are the obvious solution. But most people don’t know that there is a step in between the Pi and the mini-pc, using a more power-efficient SBC with plenty of cores, RAM, storage and ..
Networking
The other big thing, is network bandwidth. You will use networked storage: using NAS or a distributed storage solution like Rook-Ceph or Longhorn is a requirement for a multi-node cluster. Getting more than the default 1Gb of networking bandwidth will make your storage faster.
Because ten Gigabit tends to be expensive and power-hungry, let’s go for 2.5 Gigabit: it’s the same as most gaming motherboards come with and is still 2.5 times faster than the normal 1 Gigabit you get on a Pi.
EDIT (2026-05-23): 10 Gb/s is now available on an incredibly power-efficient single-board computer: the Odroid H5
The requirements
So if you are looking to build a small multi-node Kubernetes homelab, you’d want:
- 8 cores per node
- 24-32 GB of RAM per node
- 2.5 Gb/s network bandwidth
- Much more than 500 MB/s of storage bandwidth
You could get a NUC, or a Mac Mini, especially if you want to run local AI, but then you can’t use your Enterprise SSDs.
So if you have a bunch of SATA (and maybe NVMe) Enterprise disks, and you want a small energy efficient homelab, this is it.
Parts list
This is the full parts list for a single kube, excluding the SSDs themselves, which you should buy used.
| Part | Cost2 in € |
|---|---|
| RK3588-based SBC3 with 24-32 GB | 200-260 |
| Rock CPU/memory heatsink | 5 |
| 60W USB-PD power supply4 | 15 |
| M.2 to 6x SATA adapter | 20 |
| 12V barrel plug power supply | 25 |
| DC 5525 to SATA converter | 15 |
| 3D printing material | 15 |
| M.2 mounting kit | 1x 10 |
| (if using NVMe) USB-PWM fan controller | 1x5 15 |
| (if using NVMe) M.2 heatsink | 10 |
| (if using NVMe) 90 mm PWM fan | 10 |
| various shipping costs | 20 |
| —————————————————- | ——————- |
| Total Cost for SATA only, 32GB RAM | 10 + 375 per node |
| Total Cost for SATA + NVMe, 32GB RAM | 25 + 395 per node |
| Total Cost for NVMe only, 32GB RAM | 25 + 335 per node |
About the same as for a used Mac Mini, provided you already have some Enterprise drives you want to use.
I expect you have:
- a small microSD card as a boot disk (this won’t be written to except on talos config changes or upgrades)
- Enterprise SSDs and SATA data cables to put into this
- Wago fixture (5B / 5B+ only)
- Dupont cables (5B / 5B+ only)
- screws and inserts to finish the 3D-printed case
Build: hardware
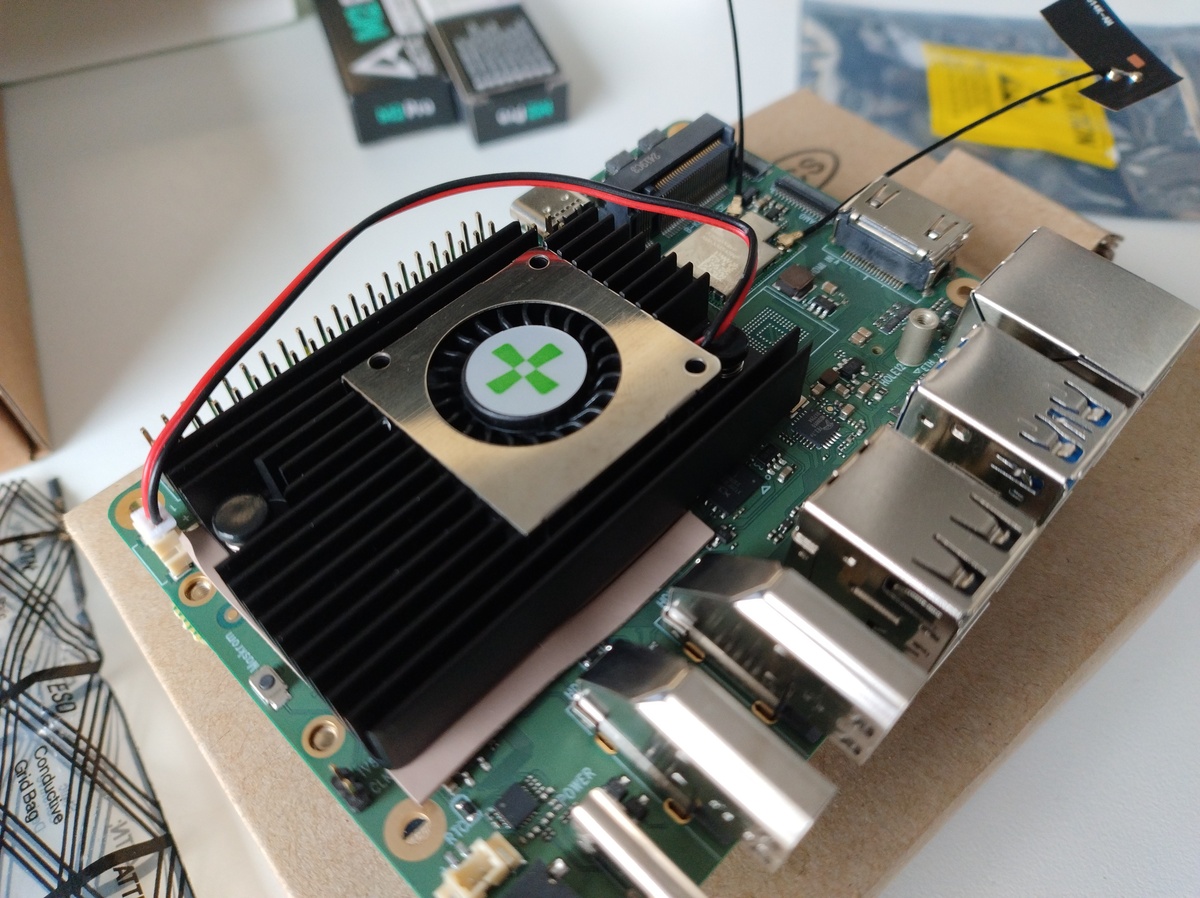
I went for the Rock 5B+ with 24GB of RAM and equipped each node with a single Micron 7450 Pro NVMe SSD, and one or more of the various SATA Enterprise SSDs I had hoarded strategically gathered. You could also use an Orange Pi 5 Plus or Max, as they are based on the same RK3588 chip and have the same PCIe 3.0 x4 storage bandwidth available. The normal Orange Pi 5 is limited to PCIe 2.0 x1 which limits bandwidth to 500 MB/s, just like the Raspberry Pi 5.
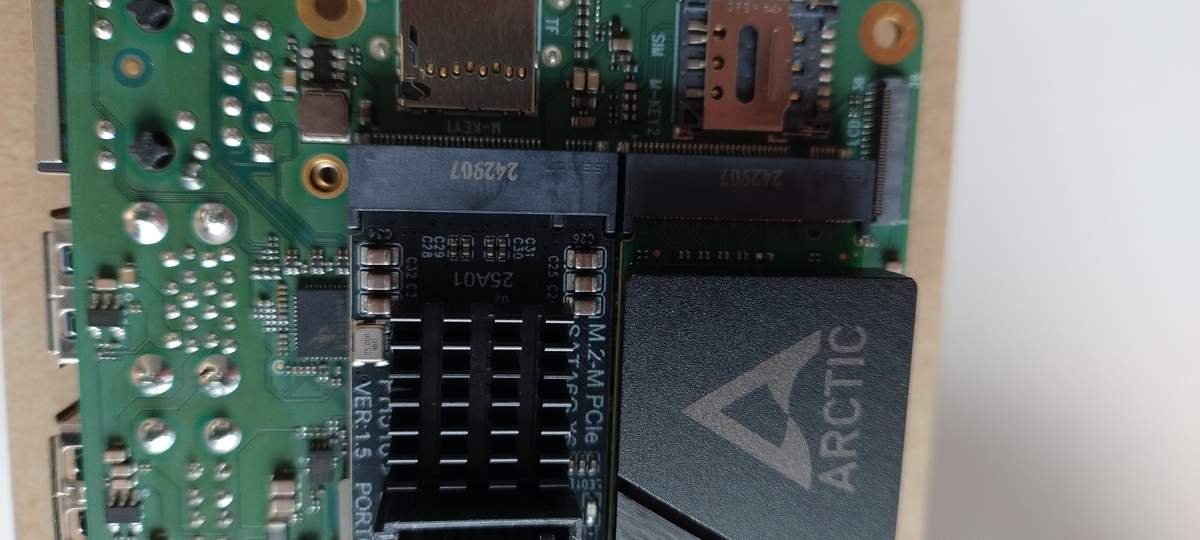
After unboxing the SBC, I first added the CPU heatsink to it. With some force, the heatsink snapped on, and then it was time to add both units to the M.2 slot on the back.
This is where the fun begins.
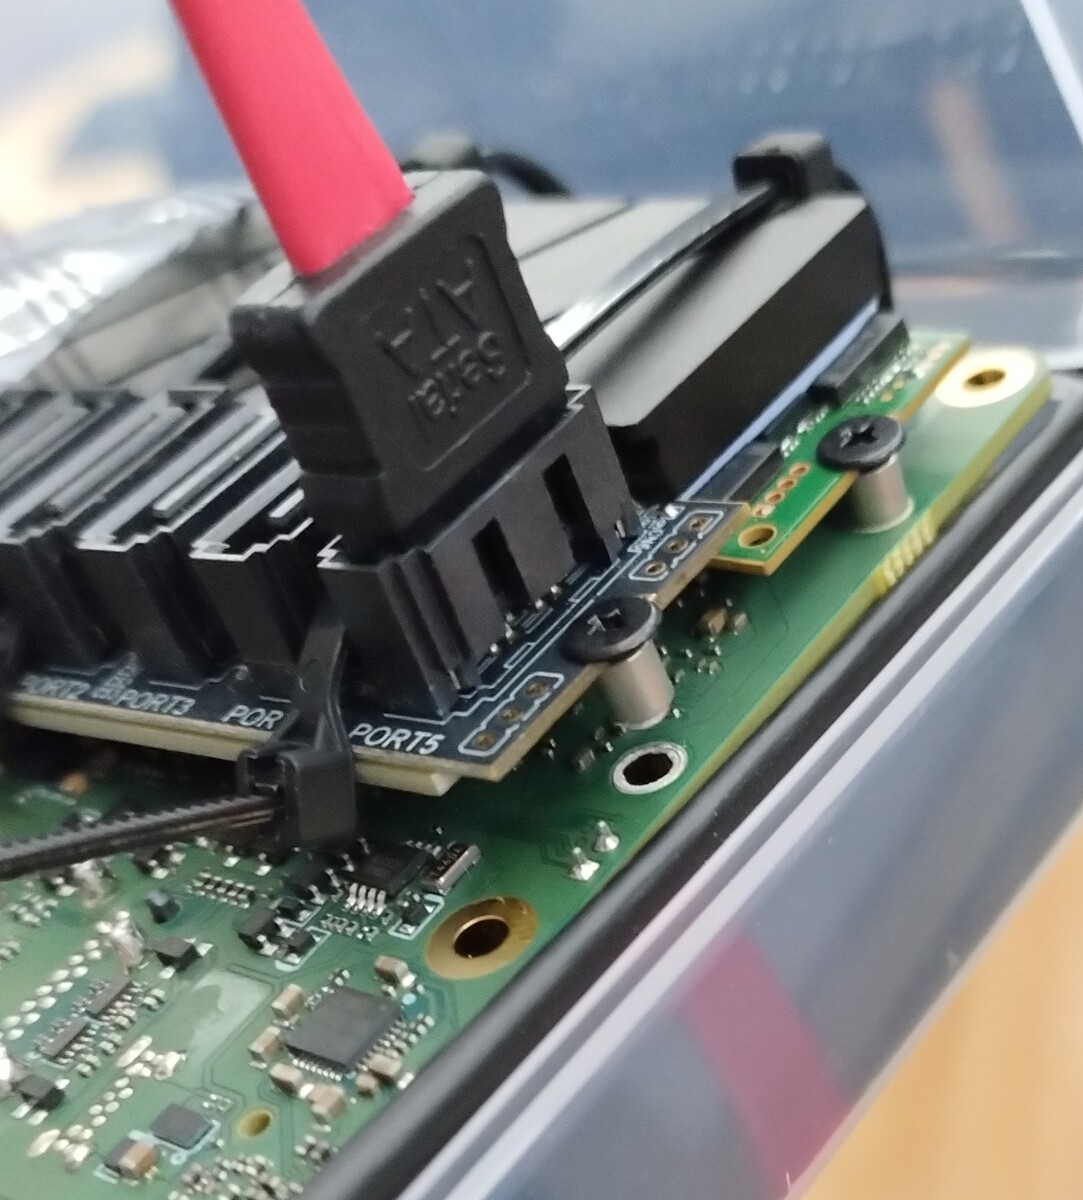
The thick power resistor
From what I can gather, this seems specific to the Rock 5B Plus model. There is a big fat power resistor, which looks like it could get quite hot, sitting exactly where one of the two M.2 SSDs should be once plugged in. This means you have to bend one of the M.2 units over that resistor to fit it in. I would not do this with a Micron 7450 SSD (it’s not quite that cheap either), so the SATA adapter had to get bent.
An M.2 SSD is held in place by a screw at the end that keeps it pushed down. Fun detail: the M.2 screw is not included! The screw should go into a little pillar on the motherboard. It turns out that the cantilever force of the adapter PCB trying to straighten itself, combined with the force needed to pull a SATA data cable out of it, was more than the little pillar could handle. It was just barely clamped into the PCB, not soldered or attached in any way.
This is where the M.2 mounting kit comes in. It has screws, standoffs, nuts and bolts and a little screwdriver. This is enough to reconstruct the M.2 standoff in a more robust way. The standoff is a little taller than the one that the Rock 5 came with, which helps to ease the tension on the M.2 stick.
Micron 7450 NVMe SSD cooling
The Micron 7450 SSD is one of the few models of NVMe Enterprise PLP SSDs that comes in a 2280 form factor, and physically fits on boards like these. Most others come in either 22110 or U.2 form factor. But there is one issue with these drives. It’s probably related to the Power-Loss Protection circuitry, but they get very hot. If you don’t apply any cooling, they will throttle.
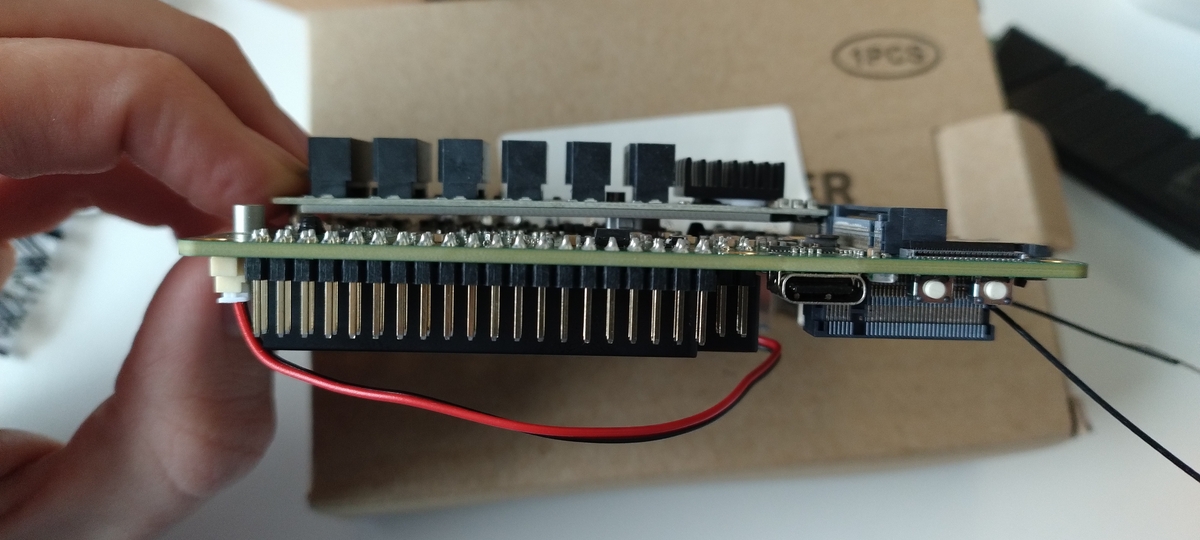
So I got myself some M2 coolers from Arctic that looked small and easy to fit. All M.2 SSD coolers however, use something that goes around the bottom of the SSD to clamp into place. This needs 1 or 2 mm of space on each side of the SSD to be able to wrap around. Unfortunately, on the Rock 5B+ specifically, there is no space between the 2 M.2 units when both slots are filled. Less than a mm in any case. This is of course not an issue if you are using only one M.2 slot, on the Rock 5B or Orange Pi 5 Max or Plus, and it even seems like there might be enough space between both M.2 slots on the bigger Rock 5T. Haven’t tried that one yet though.
So I asked my friend @bo0tzz, who was making a modular case design for these kubes, to add some hooks for tie-wraps to keep the M.2 cooler from falling off.
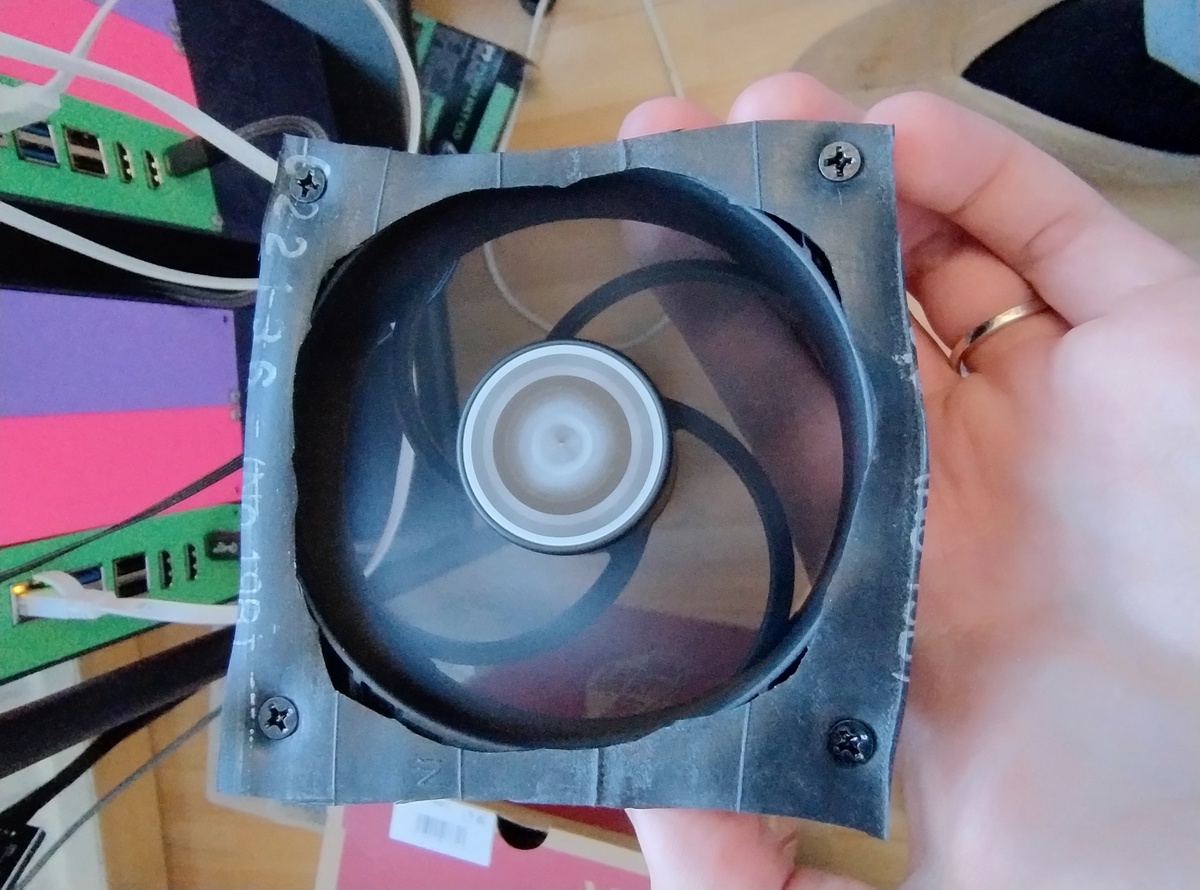
I discovered later that without any airflow over them, these drives can still get up to 70 degrees C, so that is why I bought some 90mm PWM fans and a single USB-powered PWM fan controller to control the fans on all nodes. If you buy Noctua, you get a nice vibration-damping piece of rubber with them. If you buy Arctic, it’s a lot cheaper, only slightly less silent but you do have to cut the vibration-damping rubber out of an old bike tyre yourself.
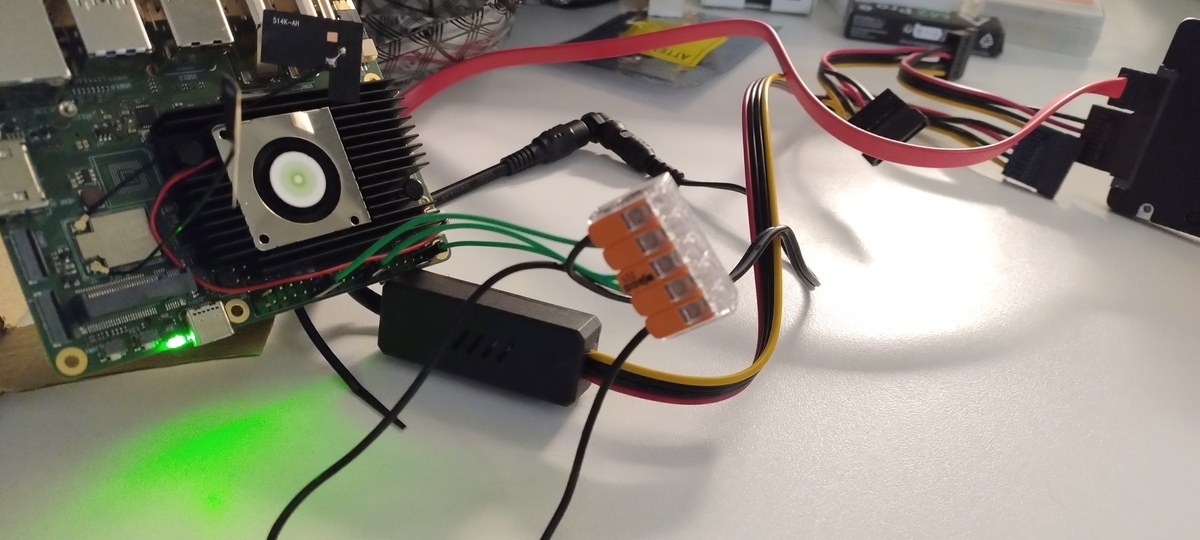
Now we have the NVMe in place, and cooled and we have the required SATA data connections to connect SATA drives. How do we power them?
Connecting externally-powered SATA drives to an SBC
The SBC does not have SATA power connector, or Molex cable sticking out, and it can’t deliver enough power on its GPIO pins either to power a few SATA drives.
We could use an external 12V barrel plug power supply, and connect it to a buck converter (you can buy these pre-made with up to 4 SATA power connectors: search for “DC 5525 SATA adapter”), so the drives get both 12V and 5V, as they would get from an ATX power supply.
However, we need to be careful not to fry the drives: if the negative side of the power supply is not connected to the SBC’s ground, they might end up at a different voltage. This voltage difference would cause a current to flow through the SSDs, from the power- pin to the data ground. That is not healthy, so we need to ensure that the external power supply shares a common ground with the SBC.
The easiest way to do that is to cut open the power supply’s negative wires (not while it is plugged in of course), strip the ends, and connect them in a 5-slot wire connector / fixture. Double check if you really cut the negative and not the positive side!
Then connect that to the SBC ground on the GPIO pins via Dupont wires. Maximum is 5 (check Radxa docs on powering via GPIO or the pinout to see which).
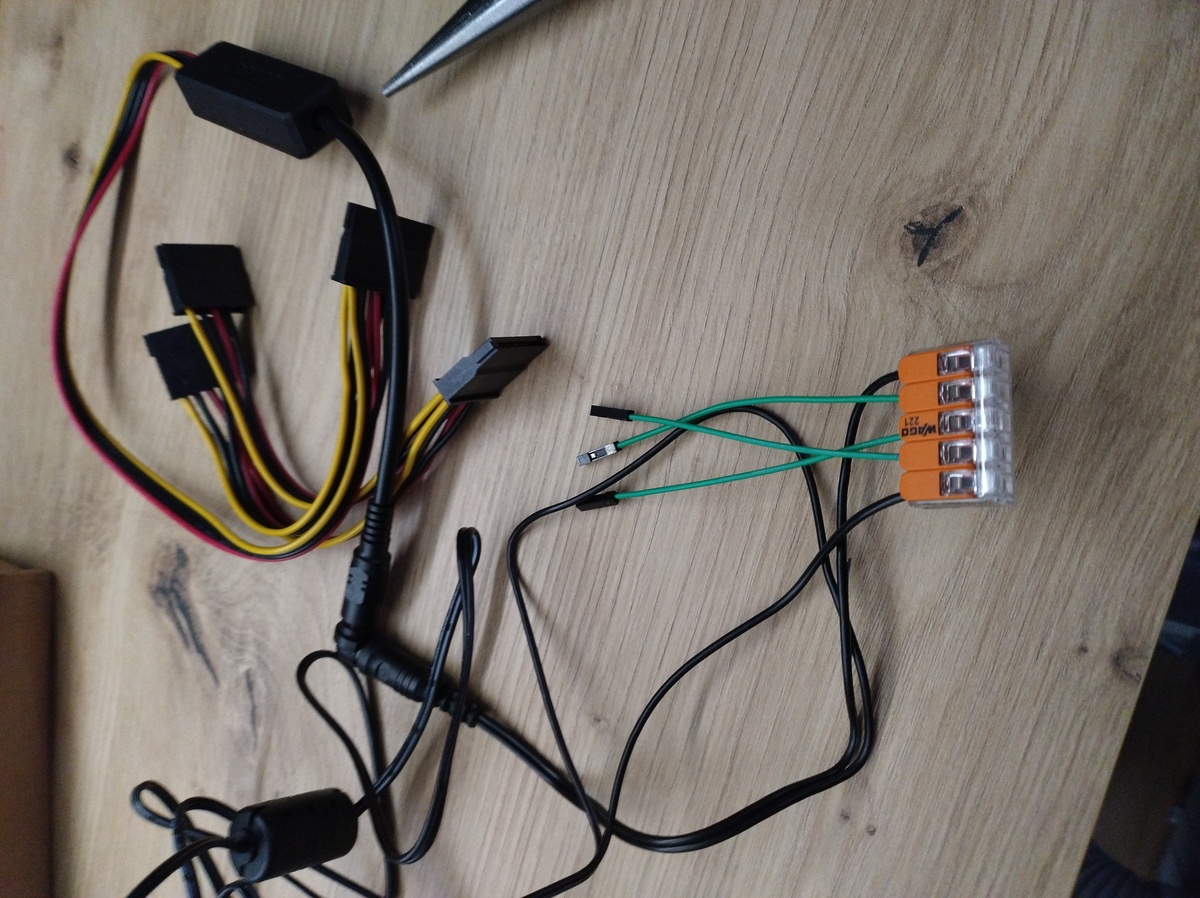
The pins marked in black on the outside of the Rock 5B+’s GPIO connector are the ground ones, but do check the official spec sheet before you connect the power.
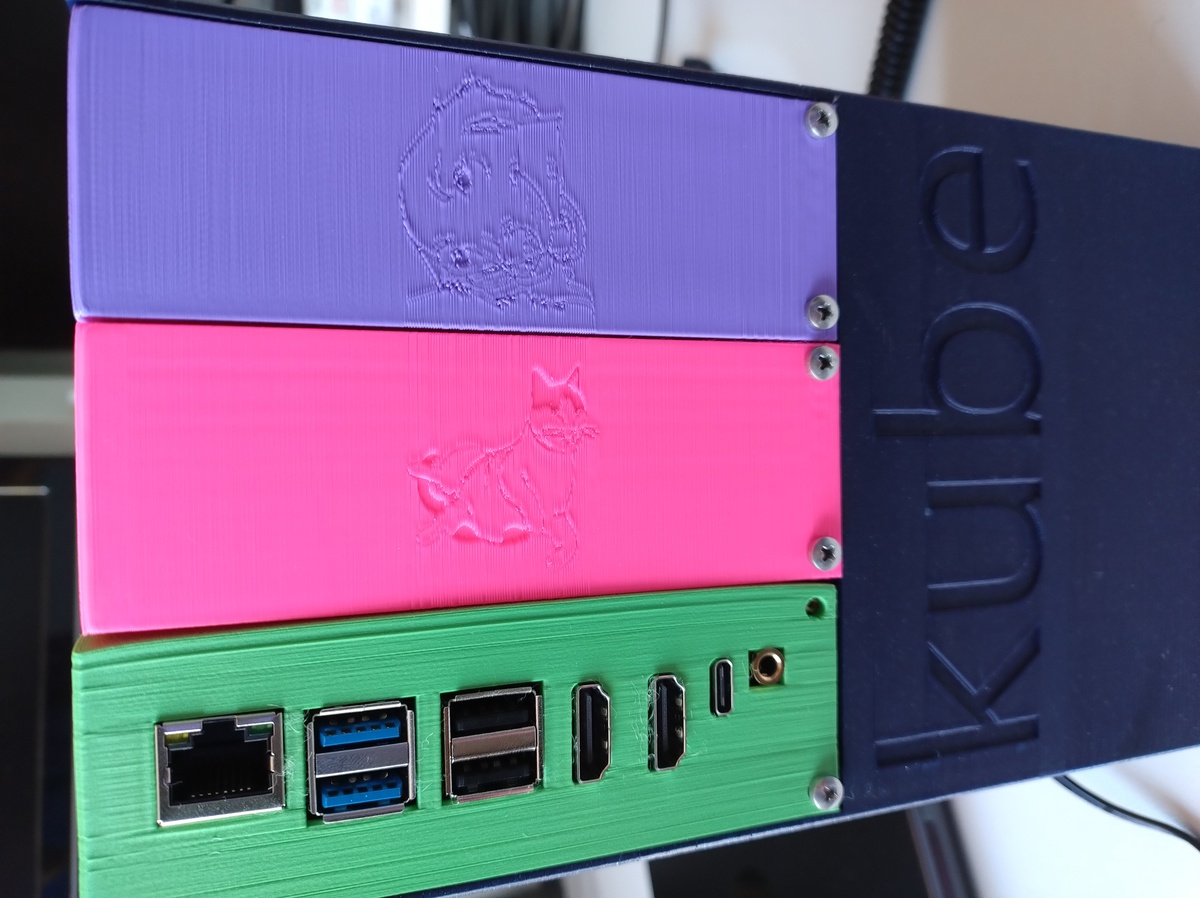
The case: Making it beautiful
After making it work, I asked @bo0tzz to make it beautiful by designing and 3D-printing a modular case for each kube.
The design can be downloaded at https://www.printables.com/model/1659104-modular-sbc-case
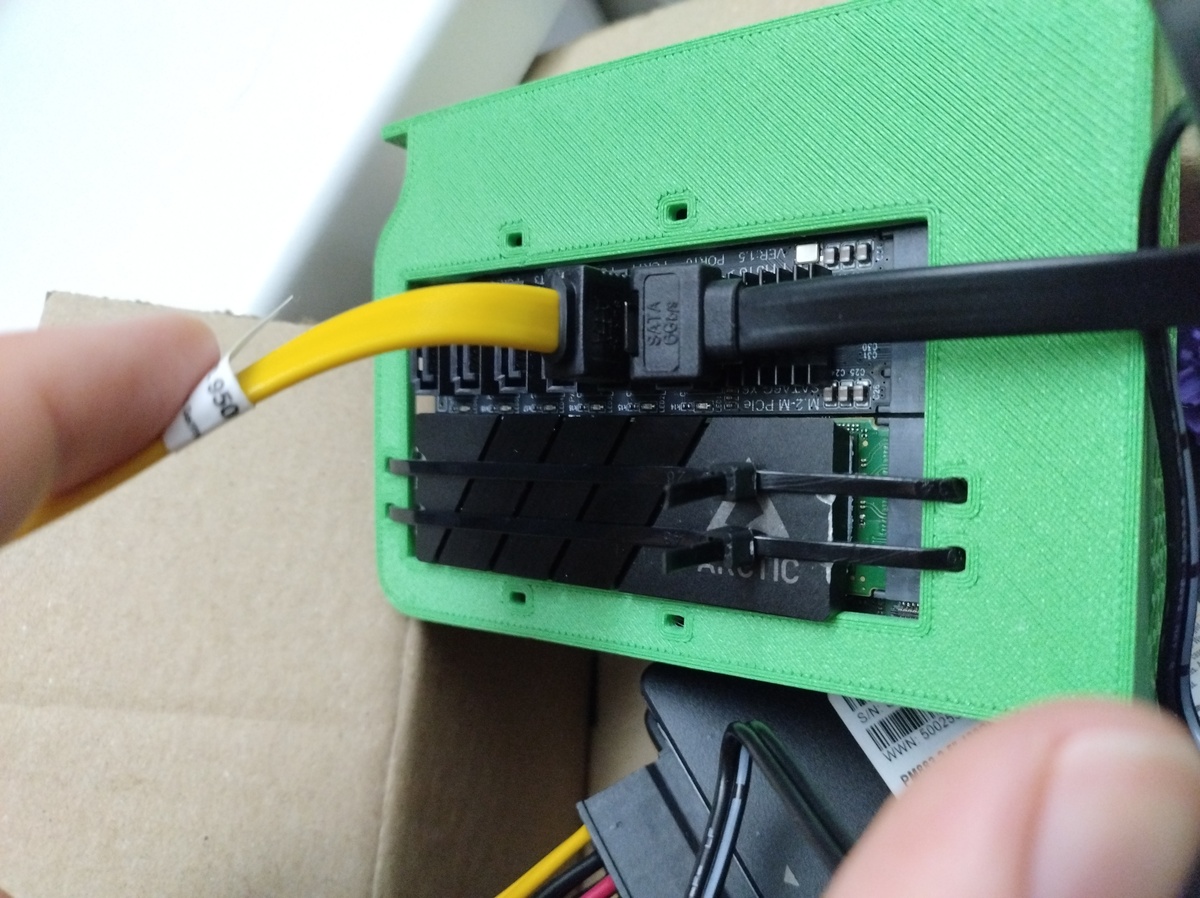
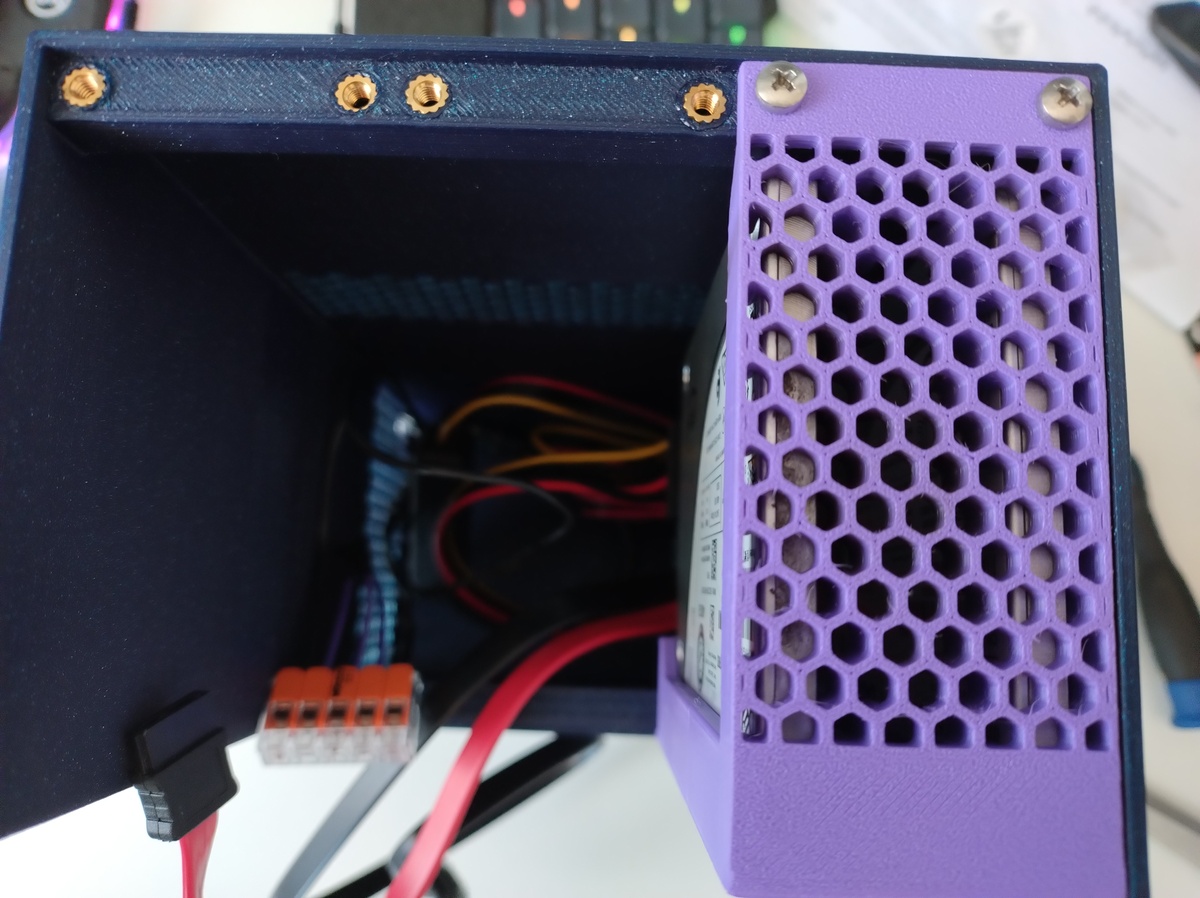
There are 3 modules:
- On the left, the Rock 5B(+) module can be screwed in. On the right, a module that holds SATA 2.5" SSDs is placed.
- In the middle, a blank slot covers the space that is occupied by SATA data cables and/or the NVMe SSD.
- At the bottom, there is enough space for the SATA data cables and the buck converter.
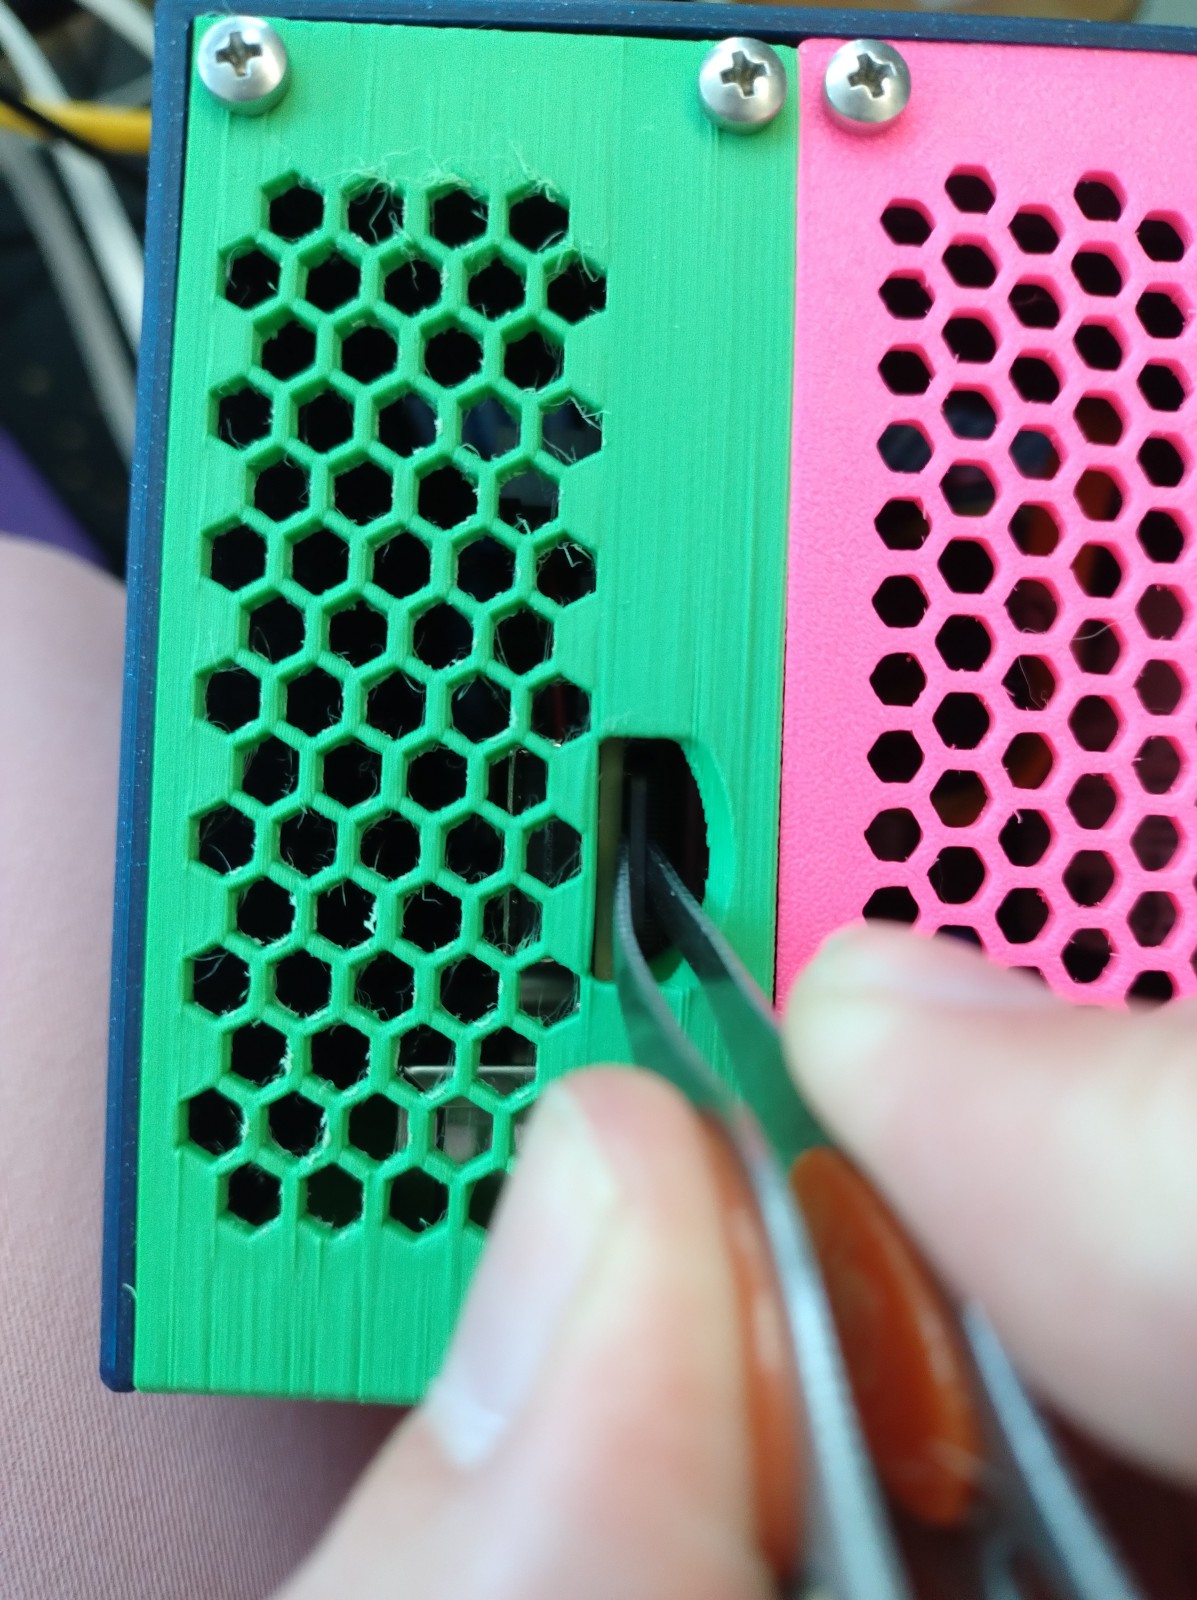
Air can come in from the sides and back if it is pulled through by putting a 90 mm fan on top.
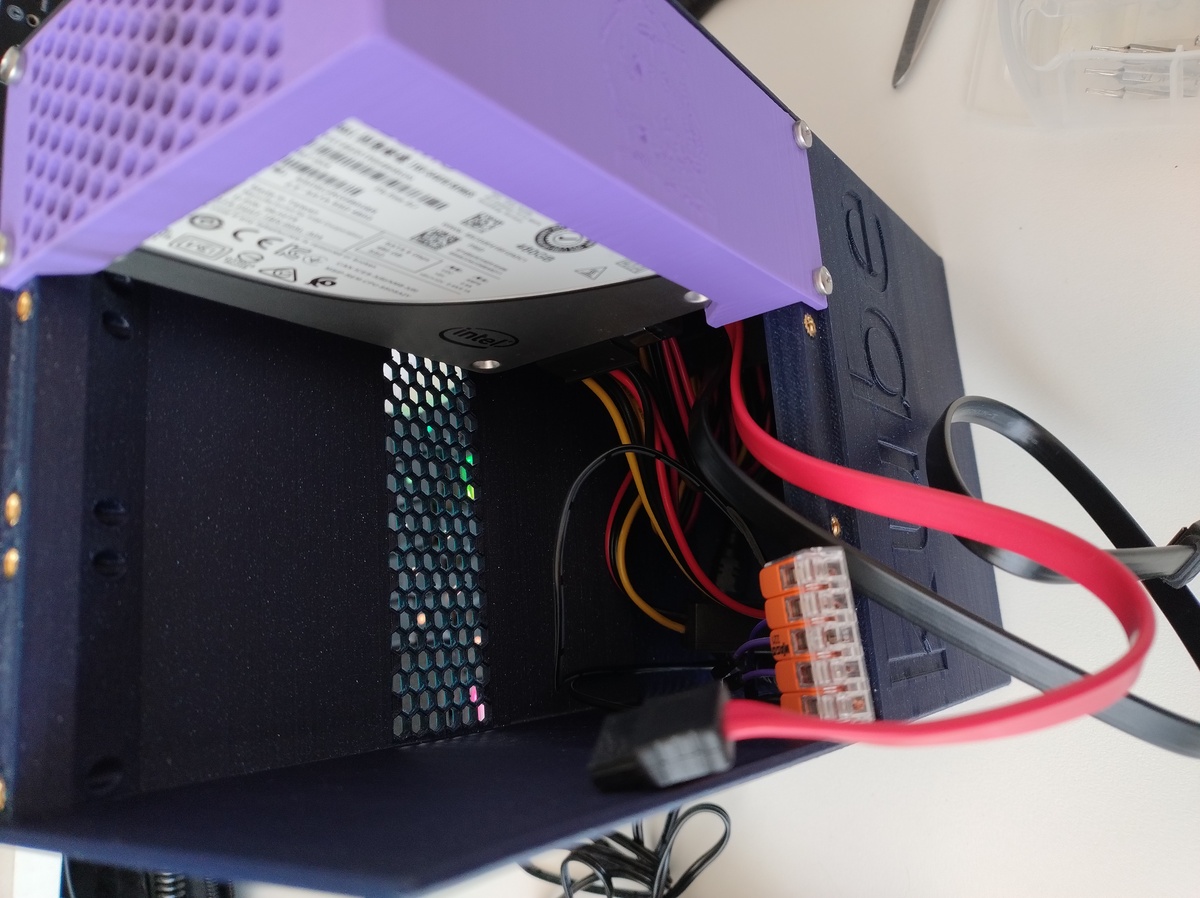
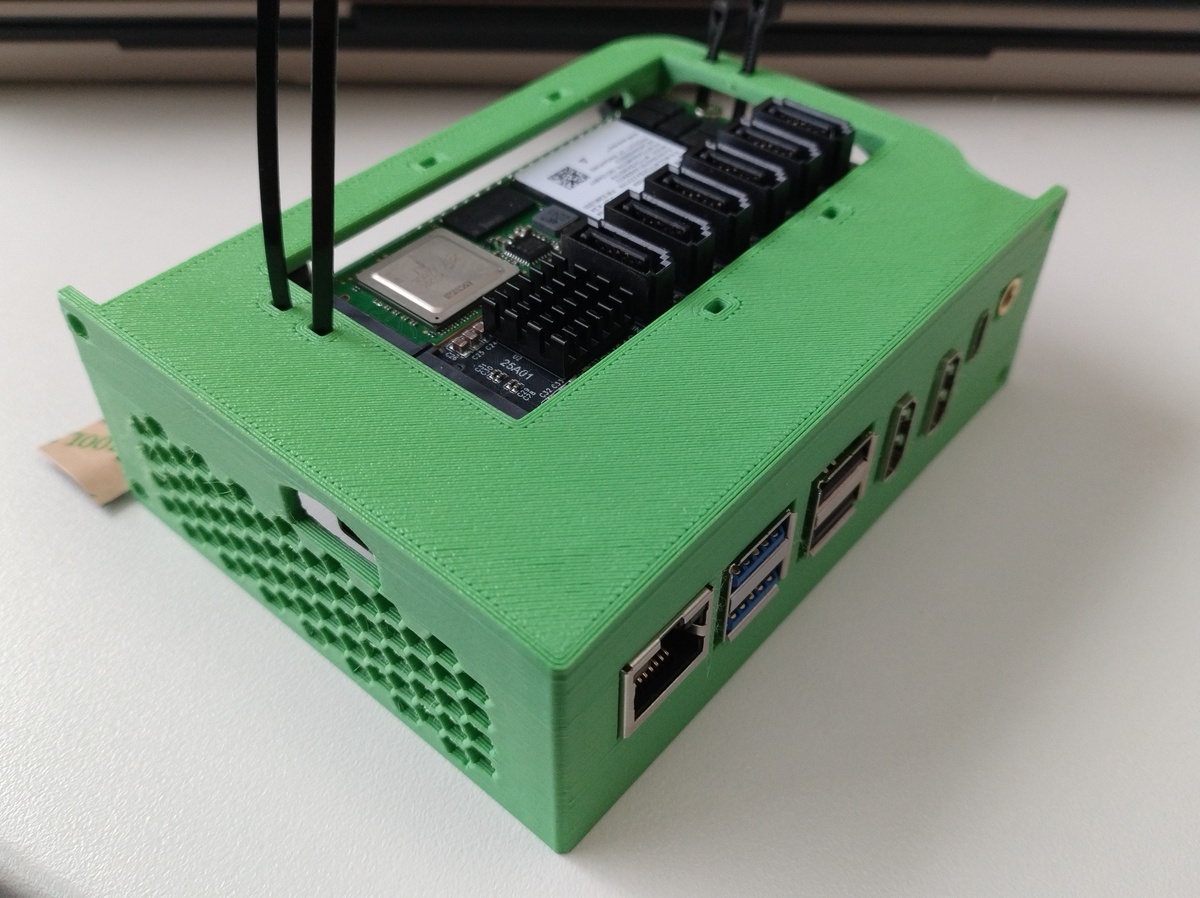
Here’s a view of the internals
Both M2 slots occupied for maximum storage
You can see why a blank panel in the middle was needed.
You can see the 2 SATA SSDs that I put in there now (there is room for 4)
The SSD module was adorned with a picture of @uhthomas’ dog holding a 2.5" SATA SSD. It is thanks to Thomas that I was convinced to use power-loss protected enterprise SSDs and he also helped me find them. And the dog is how I know him, since that is his profile picture.
The blank slot where all the heat goes, has a line tracing of my old cat, who loved to lay on his back on warm days.
The SVGs are here, you can apply them to a 3D model in the slicer before printing:
- My cat: https://fhoekstra.eu/animal-linetraces/cat-1.svg
- Thomas’ dog: https://fhoekstra.eu/animal-linetraces/dog-1.svg
Build: software
If you came here for the code, not the pictures, strap in!
This is a kube, it’s going to run Kubernetes and nothing else, so we will choose the most declarative and secure way to run Kubernetes: Talos Linux.
It may seem like a bit of a hassle to set up if you’re not familiar with it, but once you have this set up (and you can start with cluster-template, then copy the rest from my repo), you will be able to manage your entire cluster, including node maintenance, by simply updating the YAML files in your Git repo. Talos completely removes the traditional Linux layer, is immutable, very small and very secure: it is designed to run only Kubernetes, nothing else, so there is no bloat and a very small attack surface. This is simpler, faster, and much more reliable than Ansible scripts. It makes it such that working with the OS feels just like working with Kubernetes manifests.
If you use the Orange Pi 5 Plus or the Rock 5B or Rock 5T, you can follow the regular process for installing Talos and just walk through the Talos Factory at https://factory.talos.dev.
If you are using a different board, like the 5B+, that does have a Talos overlay in https://github.com/siderolabs/sbc-rockchip but is not yet selectable in the Image Factory UI, you need to use the API directly. That is what I will be explaining here.
EDIT (2026-05-31): The rock 5B+ is now available in the Talos Image Factory UI, so you can skip the “Getting Talos Image Factory IDs” section and just get your raw disk image from
https://factory.talos.devand flash it
Initial boot off of the SD card
While it is theoretically possible to boot an RK3588 machine off of an SSD, it’s really not worth the hassle. We just don’t want write-heavy directories to be on the SD card, but for the immutable root filesystem, and the boot partition, it’s not an issue. Write-heavy directories on a Talos Kubernetes machine are: /var/log, /var/lib/etcd, /var/lib/rook, /var/lib/contained, /var/mnt/local-hostpath, etc.
They all start with /var. And Talos has this concept of the EPHEMERAL system volume, which is a magic name that means: put /var on this partition. So we can just put that on an SSD via the config, and boot normally off of the SD card.
To flash the SD card, I mostly followed this doc initially, but later learned there is an easier way.
As part of your Talos config, you’ll need to put in a talosImageURL. You can fetch this from the Talos Image Factory using the Web GUI with most hardware, but if you have a Rock 5B+, it’s not too hard either, you just need to use the REST API. Follow along:
Image Factory REST API: Getting Talos Image Factory IDs:
Write a schematic-rock-5b-plus.yaml like this:
customization:
  systemExtensions:
    officialExtensions:
      - siderolabs/realtek-firmware
overlay:
  name: rock5b-plus
  image: ghcr.io/siderolabs/sbc-rockchip:v0.2.0
Then just POST it to the Talos Image Factory schematics endpoint, and you’ll get an ID back.
curl -X POST --data-binary @schematic-rock-5b-plus.yaml https://factory.talos.dev/schematics
Put this in an installer URL like this: factory.talos.dev/installer/id-goes-here and that is your talosImageURL for your config.
This logic is also encoded in the task talos:fetch-schematic-id
Image Factory REST API: Bootstrapping Talos on SBC with SD card
For bootstrap, you’ll need a raw disk image to flash to an SD card, which you can get from this URL: https://factory.talos.dev/image/id-goes-here/v1.12.6/metal-arm64.raw.xz (obviously, replace the Talos version if you want a newer version)
Then uncompress it:
xz -d metal-arm64.raw.xz
The above logic is also encoded in the task talos:fetch-raw-disk-image-for-sbc. It uses your talconfig to determine the Talos version and image ID.
Check which dev the SD card is on (check via KDE partition manager what the /dev/sdX path is)
Then write to SD card with dd: replace sdX with the SD card’s path
sudo dd if=./metal-arm64.raw of=/dev/sdX conv=fsync oflag=direct status=progress bs=4M
Insert it, connect the power and you should be able to connect to the Talos API server after a minute or 2 on the local IP address of your node:
talosctl get machinestatus --insecure -n <IP>
You can then follow the regular Talos bootstrap instructions, either from the Talos docs, or cluster-template, if you’re using it.
If this is your first time setting up a Gitops Talos cluster, I highly recommend using cluster-template.
Day 2: Upgrades
Talos version and Kubernetes version upgrades can be done according to the standard instructions in the cluster-template repo.
Upgrading the version of the siderolabs/sbc-rockchip overlay requires a different procedure. For each node:
- cordon and drain the node
- then remove the power
- Use tweezers to pull out the microSD card
- Get the new factory ID as per the instructions above, or use the task
talos:fetch-schematic-id - Update the
talconfig.yamlwith the new schematic ID. - Fetch the new raw disk image using the instructions above, or use the task
talos:fetch-raw-disk-image-for-sbc - flash a new raw disk image as per instructions above
- Put the microSD back in and power up the node
- Run an adapted version of the
talos:apply-nodetask, with –insecure and a different precondition. I named ittalos:apply-node-from-maintenance
Creating the Talos config for different disk setups
So how do we configure all those disks in Talos? They have a great documentation site, with a chat bot that is actually helpful, on how to do it with raw Talos manifests. Since I started with cluster-template, I got Talhelper with that. Its main benefit is that it integrates SOPS-encrypted secrets into Talos configuration for a full GitOps setup.
So I’ll show you how to do it with Talhelper. For this demo, I’ve set up each node with a different storage/disk configuration, then tagged it with talos-different-storage-setups since I’ll probably change that later. Here’s the code:
- Talos setups: https://github.com/fhoekstra/home-ops/blob/talos-different-storage-setups/kubernetes/bootstrap/talos/talconfig.yaml
- Rook-Ceph setup: https://github.com/fhoekstra/home-ops/blob/talos-different-storage-setups/kubernetes/apps/rook-ceph/rook-ceph/cluster/helmrelease.yaml#L92
Single NVMe only
DISCLAIMER: In the 3 months I ran with these different node setups, I had issues with Rook-Ceph on a node twice, needing a wipe and re-bootstrap. Both times it was this node, where everything is on a single shared disk. If you can do multiple disks, please give rook-ceph its own disk for the OSD.
We can actually run Talos with Rook-Ceph on a single disk, provided it has PLP and is fast enough. To do this, I create 2 volumes:
- one EPHEMERAL volume: documented here, this is a magic name in Talos which means it gets mounted on
/varand contains all the write-heavy directories underneath it: logs, container images, local storage - one raw volume: documented here, for Ceph as it needs its own block device without a file system
In Talhelper’s talconfig, I created a 250 GiB EPHEMERAL volume on the Micron 7450 like this:
nodes:
  - hostname: "talos-rock-1"
    ipAddress: "192.168.1.21"
    installDisk: /dev/mmcblk1 # This is the microSD card, as there is no onboard MMC on my Rock 5B+
    volumes:
      - name: EPHEMERAL
        provisioning:
          diskSelector:
            match: "disk.model.startsWith('Micron_7450_')"
          minSize: 250GiB
          maxSize: 250GiB
          grow: false
Then I include the raw volume manifest by pointing at it in the node’s patches section:
nodes:
  - hostname: "talos-rock-1"
    here: go the rest of the keys, as shown above
    patches:
      # We also create a raw volume for Ceph on the same NVMe disk
      - "@./patches/talos-rock-1/ceph-raw-volume.yaml"
      # And bind-mount a path for local host storage to the kubelet
      - "@./patches/talos-rock-1/csi-local-hostpath.yaml"
The raw volume manifest creates a volume without a filesystem, which is what Ceph wants:
---
apiVersion: v1alpha1
kind: RawVolumeConfig
name: osd-data # Do not use "ceph" in this name, or rook will refuse to use it for an OSD!!
provisioning:
  diskSelector:
    match: "disk.model.startsWith('Micron_7450_')"
  minSize: 400GiB
  maxSize: 400GiB
Then we point the Ceph cluster at the raw volume by using the partition label, which for a raw volume in Talos is r-volumename, so r-osd-data for us:
cephClusterSpec:
  storage:
    useAllNodes: false
    useAllDevices: false
    nodes:
      - name: "talos-rock-1"
        devices:
          -  name: "/dev/disk/by-partlabel/r-osd-data"
You may be wondering: how did I know to select the Micron 7450 with the match: "disk.model.startsWith('Micron_7450_')" selector?
Remember how I said Talos works just like you’re used to in Kubernetes? You can see all the disks on a node with talosctl -n <NODE_IP> get disks (add --insecure if your node is still in maintenance mode and hasn’t had a Talos config applied yet). Then to inspect the properties of an individual disk, you just do: talosctl -n <NODE_IP> get disk <DISK_NAME> -o yaml --insecure. You can then use its spec to write a selector, exactly as you’re used to when dealing with Kubernetes manifests and kubectl.
Using NVMe and SATA disks together
The other nodes in my example are simpler, even though they use more disks.
For both of them, I just used a full SATA disk for the Talos EPHEMERAL system volume, and gave the full NVMe to Ceph:
cephClusterSpec:
  storage:
        useAllNodes: false
        useAllDevices: false
        nodes:
          - name: "talos-rock-1"
            devices:
              - name: "/dev/disk/by-partlabel/r-osd-data"
          - name: "talos-rock-2"
            devices:
              - name: "/dev/nvme0n1" # Micron 7450 Pro 1TB
          - name: "talos-rock-3"
            devices:
              - name: "/dev/nvme0n1" # Micron 7450 Pro 1TB
For node 2, I used a second SATA disk for the local storage provisioner. This is done by democratic-csi in my cluster, though openebs is another popular solution.
This provisioner can create PVCs backed by local storage, from a volume that is mounted to the kubelet. On the other nodes, I just bind-mount a directory from the EPHEMERAL system volume.
For node 2, I instead provision a UserVolume (documented here, almost completing our tour of Talos volume provisioning docs). What you need to know is this:
A UserVolume gets a filesystem, XFS by default, and gets a partition label u-name. In addition, it gets mounted at /var/mnt/name.
nodes:
  - hostname: "talos-rock-2"
    ipAddress: "192.168.1.22"
    installDisk: /dev/mmcblk1 # This is the microSD card, as there is no onboard MMC on my Rock 5B+
    volumes:
      - name: EPHEMERAL
        provisioning:
          diskSelector:
            match: "disk.model.startsWith('SSDSC2KG480G8R')" # Intel DC S4610, 480 GB
          minSize: 250GiB
          grow: true
    userVolumes:
      - name: csi-local-hostpath
        provisioning:
          diskSelector:
            match: "disk.model.startsWith('INTEL SSDSC2BX40')"
          minSize: "50GiB"
          grow: true
    patches:
      # Here we bind the local hostpath from the separate device so we have a different patch than in talos-rock-1
      - "@./patches/talos-rock-2/csi-local-hostpath.yaml"
And then the kubelet patch for the local host path uses the /var/mnt/name path for the UserVolume:
machine:
  kubelet:
    extraMounts:
      - destination: /var/mnt/csi-local-hostpath  # In other nodes, this was /var/lib/csi-local-hostpath
        type: bind
        source: /var/lib/csi-local-hostpath
        options: ["bind", "rshared", "rw"]
If you lost track of what goes where, the full code is here:
- Talos setup: https://github.com/fhoekstra/home-ops/blob/talos-different-storage-setups/kubernetes/bootstrap/talos/talconfig.yaml
- Rook-Ceph setup: https://github.com/fhoekstra/home-ops/blob/talos-different-storage-setups/kubernetes/apps/rook-ceph/rook-ceph/cluster/helmrelease.yaml#L92
Addendum: numbers
Power use
I measured the power use of my entire homelab by plugging it into a power monitoring Zigbee outlet.
Just my micro-NAS in the form of a Raspberry Pi 4B with a single consumer 1TB SATA SSD connected via USB, and an old 1GbE router: 8W after power-on, settle on 6W after 2 minutes.
Add in the three Radxa Rock 5B+ nodes, each with a Micro 7450 Pro NVMe SSD, and two of them with a SATA-M.2 adapter and two 400GB Enterprise SATA drives, for a total of 4 SATA and 3 NVMe drives, all Enterprise, PLP-cache equipped. The Rocks themselves are powered by a single UGREEN 100W USB-PD GaN charger each, while the SATA drives are powered by one 12V barrel plug PSU per node. (2 PSUs for 4 drives)
Plugging in the 2 12V barrel plug PSUs (I didn’t get the Radxa ones, but adjustable voltage supplies which are probably less efficient) alone pushes the total power use to just above 11W. So they use about 3 W a piece even when the SSDs are not in use.
Finally, plugging in the Rocks and thus starting them bumps power use first to 65W, then settles around 50W. 16W per Rock node with around 30% CPU usage. This can probably be done more efficiently, with less power supplies, or more appropriately sized ones. The easiest way to improve this would be to get a Rock 5T, which is a slightly larger board with the same chipset, but powered via DC barrel plug, so you could easily use the same power supply for the SBC and the SSDs.
Disk performance
I measured the raw disk performance of the Rock 5B+ under Radxa OS (an older Debian with KDE that is provided by the manufacturer) with a Micron 7450 Pro NVMe drive at 1638 MB/s read, and 1441 MB/s write with the other M.2 slot empty. This is more than 3x the storage bandwidth you get with a Raspberry Pi 5 or a Rock 5C and the NAS solutions for them, no matter how many disks you connect.
Of course, if you’re doing your first homelab, feel free to use an old laptop or 3, some Raspberry Pis you had laying around, or whatever else. And run k3s on it. ↩︎
You may have noticed that 2026 is a weird time for computer hardware prices and availability. I am listing the prices at which I bought these things ↩︎
If you only need 1 NVMe or only need up to 6 SATA connections, you can make do with a Rock 5B, or Orange Pi 5 Plus or Max. If you want the same PCIe 3.0 x4 split over 2 M.2 slots, get a Rock 5B+ or Rock 5T. I went with Rock 5B+ for my
kubes. ↩︎The Radxa Rock 5B and 5B+ are powered exclusively via USB-PD (12V), but there are some quirks around USB-PD negotiation as they are starting up. Not all USB-PD chargers can give these SBCs the voltage they need as they are booting, so I recommend getting the 60W ones from Radxa themselves if you get a Rock 5B. I was lucky to get them to work with UGREEN GaN 100W USB-PD chargers. The Rock 5T is powered by 12V 5525 barrel plug adapter, so that one is easier to power from the same power brick that powers your SATA SSDs. ↩︎
(you only need one to power the fans on multiple
kubes if they are close together) ↩︎